

If your bedroom door sticks every summer, you are not imagining the problem, and you do not need to force it shut for another season. Learning how to fix a door that sticks in humid weather starts with finding where it rubs, then working from the cheapest and simplest checks toward planing or sanding only if the door still needs it. Most sticking doors improve a lot after a few small adjustments, and a good seal at the end helps the fix last through the next humid summer.
This guide follows that order on purpose. It begins with diagnosis, moves to fixes that need no tools, then covers hinge and strike plate work, and only then explains how to plane or sand safely. That way you avoid removing wood you cannot put back, and you protect a door that may shrink back a little when dry air returns in fall.
Why Wooden Doors Swell in Summer
Wood is a natural material that takes in moisture from the air. When humidity rises, the fibers in a wooden door absorb water vapor and expand, mostly across the grain. That expansion is small, often only a fraction of an inch, but a door frame leaves very little room for movement. A gap of about one eighth of an inch around the edges is normal, so even a slight swell can turn a smooth closing door into one that drags, squeaks, or refuses to latch.
Summer makes this worse for a few reasons. Warm air can hold more moisture than cool air, showers and cooking add steam inside the home, and a bathroom door or a door near a laundry room faces extra damp air every day. A door that faces a porch or an unconditioned garage can also swell on the side that meets humid outdoor air while the inside face stays drier, which can cause a slight bow.
Paint and finish matter too. A door edge that was never sealed, or one where the top and bottom edges were left bare, will absorb moisture faster than a fully sealed door. Those bare edges act like a sponge. That is why an older painted door can stick at the top or bottom even when the faces look fine. The fix is not only to remove the high spot. It is also to seal the wood so moisture cannot get in so easily next time.
Why the Problem Often Fades in Winter
Many readers notice that the same door works fine in January and sticks again in July. That pattern is a strong clue that humidity, not a bent frame, is the main cause. In winter, heated indoor air is usually dry, and the wood gives up moisture and shrinks back toward its normal size. If you plane a door aggressively in August, you may end up with a loose and drafty door in January. This is one more reason to start with small adjustments and to remove as little wood as possible.
When Swelling Points to a Bigger Moisture Problem
A door that sticks all year, swells suddenly after a leak, or shows stains, soft wood, or a musty smell needs a closer look. Check for a roof leak above the frame, a plumbing leak in a nearby wall, or water pooling near an exterior door. Fix the water source first. Planing a door while water keeps reaching it will only buy a short break before the problem returns.
Find the Exact Sticking Point Before You Fix Anything
Guessing where a door rubs leads to sanding the wrong edge and making the gap uneven. Take five minutes to find the real contact point. Close the door slowly and watch and listen. Note whether it drags at the top, the bottom, the latch side, or the hinge side. Then open it and look for shiny rub marks, worn paint, or dust lines on the edge and the frame. Those marks tell the true story.
For a more exact test, rub a piece of chalk or a soft pencil lightly along the door edge where you suspect rubbing, then close the door gently and open it again. The chalk will transfer to the frame at the contact point. You can also slide a thin piece of paper around the closed door. Where the paper stops sliding freely, the gap is tight. Mark that spot lightly with a pencil so you can work on that area only.

Check the hinges while you are at it. A door that sags will often rub at the top on the latch side or at the bottom on the hinge side, even if the wood has not swelled much. Lift the door gently by the handle. If it moves up and down more than a tiny amount, loose hinges may be part of the problem. A sagging door and a swollen door can look alike, but they need different fixes, so this check saves time.
Also check the weatherstripping. Thick or swollen weatherstripping can mimic a sticking door, especially after a new strip has been fitted. If the door closes well with the strip pressed flat by hand but sticks when the strip is in place, the strip may be too thick or fitted in the wrong spot. Try a thinner profile before you touch the wood.
Quick Fixes That Need No Tools
Start here, even if you feel sure the door needs planing. These checks cost nothing, take only minutes, and often solve a mild summer stick.
- Run a dehumidifier in a damp hallway or bedroom and aim for indoor humidity in the range of 30 to 50 percent. Many doors free up within a day or two as the wood dries slightly.
- Improve airflow by opening an interior door nearby, running a bathroom fan during and after showers, and using a kitchen range hood while cooking. Less steam in the air means less moisture for the door to absorb.
- Rub a plain white candle or a bar of soap along a lightly rubbing edge as a temporary lubricant. This will not fix a badly swollen door, but it can ease a minor drag while you plan a lasting repair.
- Vacuum dust and grit from the frame and the hinge area. Built up debris can add just enough thickness to make a tight door stick.
- Check for a rug, mat, or thick carpet that catches the bottom of the door. Trimming or moving the rug is far easier than trimming the door.
If a dehumidifier helps, note that result. It confirms humidity as the cause and suggests that sealing the door edges will be worth the effort. If nothing changes after a day or two at lower humidity, move on to hinge checks. The door may be sagging, or the high spot may be larger than a humidity swing can explain.
For a related latch problem, it helps to know whether the door is failing to close because it rubs or because the latch misses its target. If the latch is the issue, read this guide on how to fix a door that will not latch before you remove any wood.
Hinge and Strike Plate Fixes That Solve Most Sticking Doors
Loose hinges are one of the most common and most overlooked causes of a sticking door. Screws work loose over years of use, the door drops by a small amount, and suddenly the top corner hits the frame. Tightening or replacing a few screws can restore the gap without touching the door edge at all.
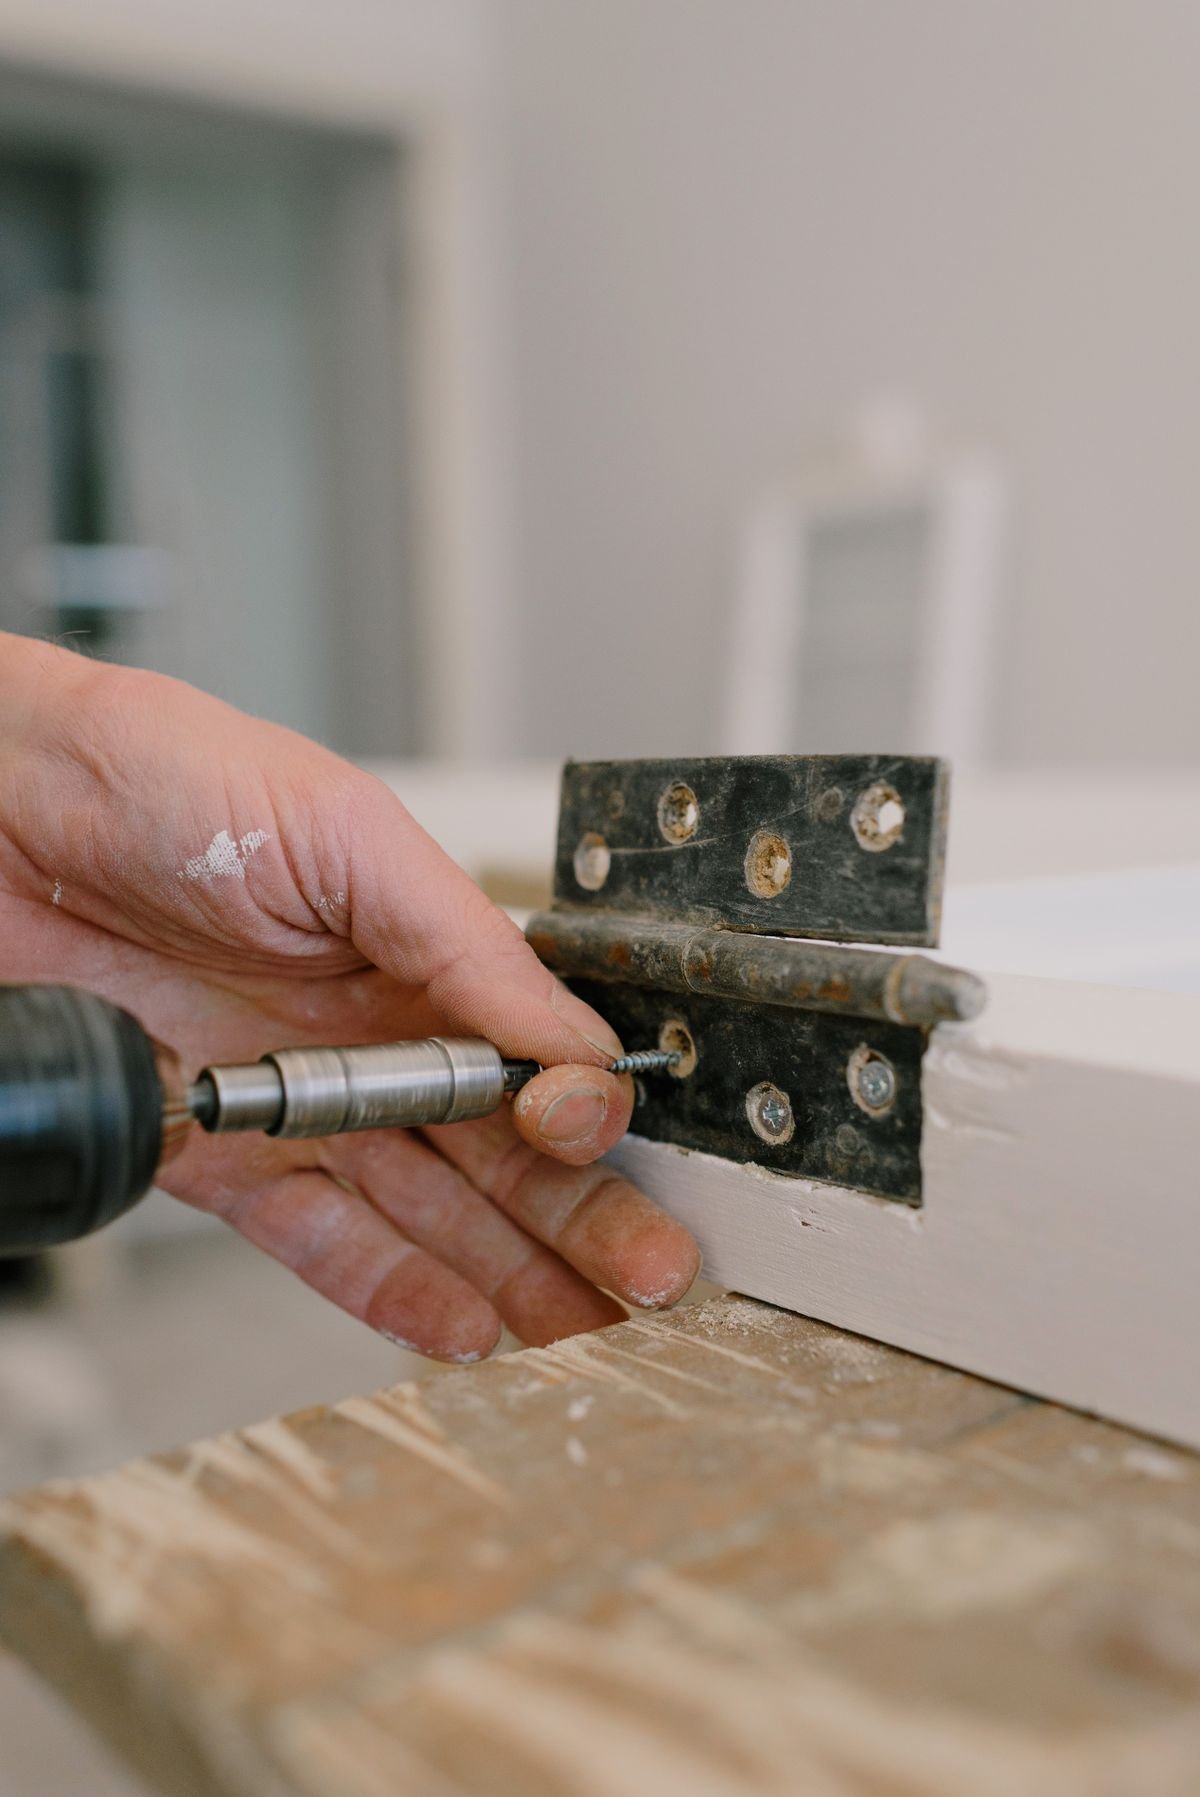
Start with the top hinge, because it carries most of the weight. Tighten each screw slowly and test the door after each one. If a screw spins without gripping, the hole is stripped. Remove that screw, push two or three wooden toothpicks coated in wood glue into the hole, trim them flush once the glue dries, and then drive the screw back in. The toothpicks give the screw fresh wood to grip. For a heavier solid wood door, a longer screw that reaches into the wall framing behind the frame can pull a sagging hinge back into place. A 3 inch screw in the top hinge often makes a clear difference.
Check all hinges for bent leaves or screws that sit proud of the hinge plate. A screw head that sticks up even slightly can push the hinge out of alignment. Replace damaged screws with matching screws of the same head type so they sit flush. Lubricate squeaky hinge pins with a drop of household oil, working the door back and forth to spread it, and wipe away excess oil so it does not stain the paint.
Adjusting the Strike Plate
If the door closes but the latch does not catch cleanly, the strike plate may need a small shift. Loosen its screws, move it a fraction in the direction that helps the latch meet the center of the plate opening, and tighten again. If the plate needs to move only a hair, you can file the edge of the opening slightly rather than moving the whole plate. If it needs to move more, fill the old screw holes with glued toothpicks or dowels, let them dry, and drill new pilot holes in the corrected position.
Keep adjustments small and test often. A strike plate that moves too far can create a new problem, such as a door that latches but rattles in the frame. The goal is a latch that clicks in smoothly with the door fully closed and no need to push or lift the handle.
How to Plane or Sand a Door Safely
Only plane or sand after the quick fixes and hinge fixes have failed. Removing wood is permanent, and a door that is planed too much will let in drafts and noise in winter. Work in small steps, test the fit often, and remember that you can always take off a little more, but you cannot put wood back.
First, mark the exact high spot you found with chalk or pencil. Decide whether you can work on the door in place or whether you need to remove it. Light sanding can often be done in place with the door held open and protected. Planing usually needs the door removed and laid flat on sawhorses so you can work along the edge evenly. If you remove the door, label the hinges and take a photo of the hinge positions so rehanging is simple.
For a small high spot, start with sandpaper wrapped around a sanding block. Use 80 grit paper to remove material steadily, then finish with 120 grit paper to smooth the edge. Keep the block flat against the edge so you do not round it over. Sand along the edge, check the fit, and repeat. This slow method gives excellent control and is the safest choice for a first attempt.
For a larger high spot, a sharp hand plane or a small electric planer will work faster, but it needs a steady hand. Set the blade to take a very thin shaving, work in the direction of the grain, and keep the plane flat on the edge. Never plane the hinge side deeply, because that can change how the door sits in the frame and affect the latch alignment. Plane the latch side or the top or bottom edge where the rub mark sits, and stop as soon as the door closes with a small even gap.
Safety and Cleanup Tips
- Wear safety glasses and a dust mask, and work in a well ventilated space. Wood dust irritates eyes and lungs, especially in a closed room.
- Support the door fully on sawhorses if you remove it. A door that tips while you plane can crack or injure a foot.
- Keep fingers clear of the plane blade and the sanding area, and unplug an electric planer before adjusting the blade.
- Vacuum dust from the edge and the frame before you test the fit, so dust does not fake a tight spot.
- Check the gap with a thin piece of paper all around the door. Aim for a small even gap that lets the door close without force and latch without lifting the handle.
If the sticking point is at the bottom of the door, check the floor first. A swollen threshold, a raised tile edge, or a new floor finish can all reduce clearance. Trimming the door bottom is a bigger job, because it may expose unsealed wood and change how the door clears rugs. When in doubt, sand a little, seal the edge, and live with the result for a week before removing more.
Seal the Edge So It Does Not Swell Again
This step is the difference between a fix that lasts one summer and a fix that lasts for years. Bare wood absorbs moisture freely, so every edge you sand or plane must be sealed again. The top and bottom edges are the most often forgotten, yet they are the easiest entry points for humidity.
Use a primer and paint, a clear polyurethane finish, or an exterior grade sealer that suits the existing finish. For a painted door, prime the bare edge, let it dry fully, and apply two thin coats of paint. For a natural wood door, apply a clear finish that matches the sheen of the rest of the door. Let each coat dry according to the label, and do not rush rehanging a door with tacky paint, because it can stick to the frame and peel.
Work in mild conditions if you can. Paint and polyurethane cure best when temperatures are roughly 50 to 85 degrees Fahrenheit and humidity is not extreme. A very humid day can slow drying and leave a soft finish. If you must paint on a humid day, allow extra drying time and keep air moving with a fan pointed away from the wet surface so dust does not blow onto it.
While the finish dries, inspect the rest of the door edges. Seal any other bare spots you find, especially the top edge above eye level and the bottom edge near the floor. A full seal around all six sides of a door, including top and bottom, is the standard that keeps moisture out most effectively. For other small home repairs that save a bigger job later, this guide on how to stop a squeaky floorboard without removing carpet follows the same idea of fixing the cause with the least disruption.
When to Call a Professional
Most sticking doors are a do it yourself job, but some situations call for a carpenter. Call a professional if the frame itself is twisted, cracked, or pulling away from the wall, if the door has rot or soft spots, if the floor or wall has shifted noticeably, or if an exterior door affects security or weatherproofing. A door that sticks after flooding, or one with visible mold, also needs professional assessment, because the moisture source and any health risks matter more than the fit.
Also consider professional help for a valuable antique door, a fire rated door, or a door with complex glass panels. A wrong cut on those doors can reduce their value or their safety rating. A carpenter can often adjust the frame, replace a hinge mortise, or fit a new door more cleanly than a first attempt with a plane.
Get a clear quote before work starts. Ask what the carpenter will adjust first, whether planing is truly needed, and how the edges will be sealed after the work. A good tradesperson will follow the same order as this guide, starting with hinges and alignment before removing wood.
Final Takeaways on how to fix a door that sticks in humid weather
The lasting way to handle this problem is simple to remember. Diagnose first, try the free fixes, tighten and adjust the hardware, remove only a little wood if you must, and seal every edge you touch. That sequence protects the door in winter, keeps the gap even, and reduces the chance that the same stick returns next summer. In short, how to fix a door that sticks in humid weather is less about force and more about patience, small steps, and a proper seal at the end.
Keep a note of what worked for your door. If a dehumidifier helped, keep indoor humidity in the range of 30 to 50 percent during damp months. If a longer top hinge screw fixed the sag, check that screw once a year. If you planed a small high spot, check the seal each spring before humidity climbs. A few minutes of care each year will keep a bedroom door closing smoothly, quietly, and without a shoulder push, season after season.
Frequently Asked Questions
Why does my door stick only in summer?
Wood absorbs moisture from humid summer air and expands slightly across the grain. Even a fraction of an inch can close the small gap around a door, so it drags or sticks. In dry winter air the wood shrinks back, which is why the problem often fades on its own.
Should I plane a sticking door right away?
No, not as a first step. Check the sticking point, try lower humidity and airflow, and tighten the hinges first. Plane only a marked high spot after those steps fail, and remove as little wood as possible so the door does not become loose in winter.
Can I fix a sticking door without removing it?
Yes, in many cases. Hinge tightening, strike plate adjustment, and light sanding can often be done with the door in place. Remove the door only for larger planing work, so you can lay it flat and keep the edge even.
What should I use to seal a sanded door edge?
Seal it with the finish that matches the rest of the door. Use primer and paint for a painted door, or a clear polyurethane finish for natural wood. Cover the top and bottom edges too, and let each coat dry fully before rehanging the door.
How do I know if the problem is humidity or a sagging door?
A humidity problem usually comes and goes with the seasons and affects a door that worked well before. A sagging door often rubs at the top on the latch side, moves when you lift the handle, and has loose hinge screws. Tightening the hinges will usually improve a sagging door at once.

1 Comment
Pingback: Fix a Squeaky Office Chair Without WD40